


To make your blog post more user-friendly and easy to read, include a table of contents. So how to add table of contents in blogger? you may have a question. A Blogger’s blog post table of contents makes it easier for readers to read the post.
Greetings, in this post I’ll demonstrate how to add a table of contents to Blogger. Utilizing a plugin makes adding a table of contents in WordPress incredibly simple. But since Blogger does not support plugins, adding a table of contents is very challenging.
Here, I’ll walk you through the process of adding a table of contents to Blogger, step by step. You should be aware of some advantages of a table of contents (TOC) in Blogger blog posts before adding this to your blog.
SEO Table Of Content Benefits (TOC)
Google always appreciates comprehensive and well-organized blog posts and web pages. Additionally, you can make your Blogger blog posts well-structured and user-friendly by including a table of contents. To improve your results in Blogger, add a table of contents.
Additionally, your blog post will be organized and reader-friendly if you include a TOC. Jump to links may be displayed by Google on the Search Result Page; this is excellent for webmasters and can raise your CTR.
Complete steps: By including a script in the template and post
I’ll walk you through the process of adding a table of contents in Blogger step by step. I broke down this process into 6 easy steps.
- Step 1: Log into the Blogger blog you would like to add a table of contents to first (TOC). Select edit HTML after selecting the theme.

- Step 2: Locate the /head> tag in the HTML file and paste the following code there, Just before the /head> tag on your Blogger template, copy and paste this script.
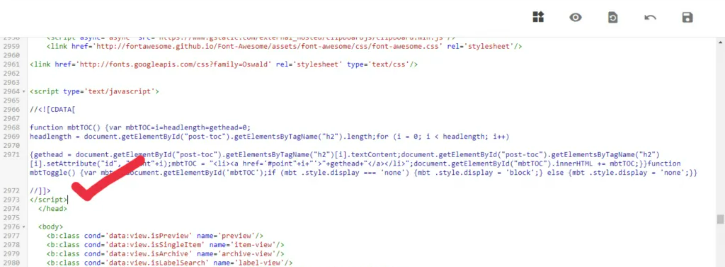
<link href=’http://fortawesome.github.io/Font-Awesome/assets/font-awesome/css/font-awesome.css’ rel=’stylesheet’/>
<link href=’http://fonts.googleapis.com/css?family=Oswald’ rel=’stylesheet’ type=’text/css’/>
<script type=’text/javascript’>
//<![CDATA[
function mbtTOC() {var mbtTOC=i=headlength=gethead=0;
headlength = document.getElementById(“post-toc”).getElementsByTagName(“h2”).length;for (i = 0; i < headlength; i++)
{gethead = document.getElementById(“post-toc”).getElementsByTagName(“h2”)[i].textContent;document.getElementById(“post-toc”).getElementsByTagName(“h2”)[i].setAttribute(“id”, “point”+i);mbtTOC = “<li><a href=’#point”+i+”‘>”+gethead+”</a></li>”;document.getElementById(“mbtTOC”).innerHTML += mbtTOC;}}function mbtToggle() {var mbt = document.getElementById(‘mbtTOC’);if (mbt .style.display === ‘none’) {mbt .style.display = ‘block’;} else {mbt .style.display = ‘none’;}}
//]]>
</script>
- Step 3: Discover the code for]]>/b:skin> in your Blogger template, and then paste the following code directly above this tag.
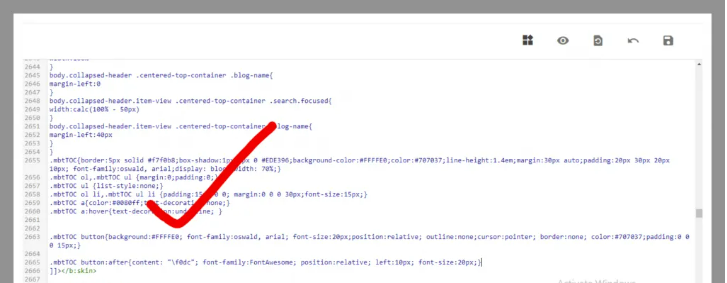
.mbtTOC{border:5px solid #f7f0b8;box-shadow:1px 1px 0 #EDE396;background-color:#FFFFE0;color:#707037;line-height:1.4em;margin:30px auto;padding:20px 30px 20px 10px; font-family:oswald, arial;display: block;width: 70%;}
.mbtTOC ol,.mbtTOC ul {margin:0;padding:0;}
.mbtTOC ul {list-style:none;}
.mbtTOC ol li,.mbtTOC ul li {padding:15px 0 0; margin:0 0 0 30px;font-size:15px;}
.mbtTOC a{color:#0080ff;text-decoration:none;}
.mbtTOC a:hover{text-decoration:underline; }
.mbtTOC button{background:#FFFFE0; font-family:oswald, arial; font-size:20px;position:relative; outline:none;cursor:pointer; border:none; color:#707037;padding:0 0 0 15px;}
.mbtTOC button:after{content: “\f0dc”; font-family:FontAwesome; position:relative; left:10px; font-size:20px;}
- Step 4: It’s a very simple process. Replace the data:post.body/> code in your theme with the new code provided below. If your theme uses this code more than once, you must replace it all with the updated code.
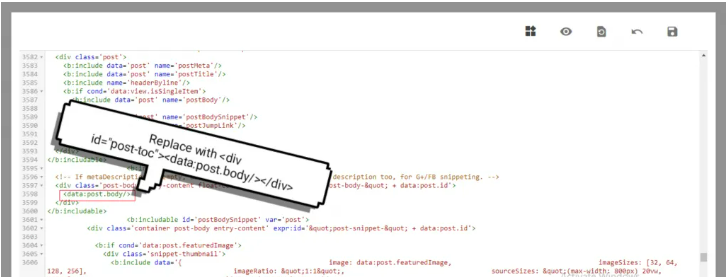
<div id=”post-toc”><data:post.body/></div>
- Step 5: Select HTML view, then paste the following code wherever you want the Blogger post’s table of contents to appear.
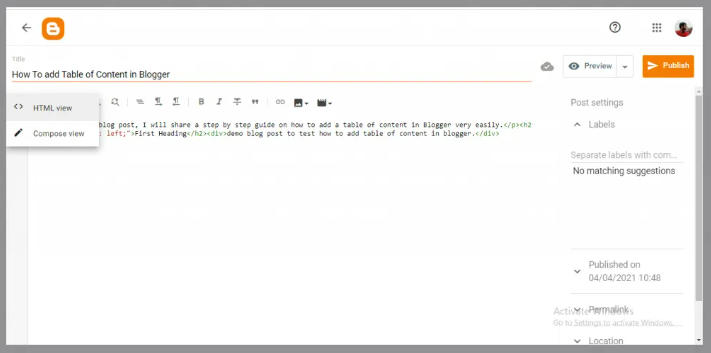
<div class=”mbtTOC”>
<button onclick=”mbtToggle()”>Table Of Contents</button>
<ul id=”mbtTOC”></ul>
</div>
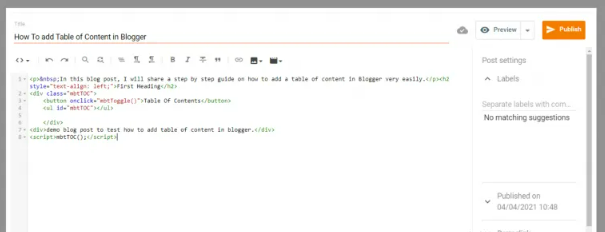
and have included it below the text
A Table of Content is now visible in Blogger posts. These two pieces of code must be added to each page or post on Blogger where you want to display a table of contents.
You simply need to paste the script and choose whether you want the table of contents to appear before or after the first heading.
Any element’s color can be changed easily in a few short steps if you want to. Find the default color and style for each code, and then modify as desired. Font, font color, and font style can all be changed.
Verify that you correctly completed all the steps. You can view a preview of your blog post regardless of whether the Blogger’s table of contents is visible.
If you modify your Blogger template, you must repeat these steps to maintain the table of contents in Blogger.
Reference site: https://www.roseblogging.com/add-table-of-content-in-blogger/


