In the modern world of development, there are many ways to build a website. A single page application (SPA) is an app that resides online and consists of a single webpage. The advantage of a SPA is that it tends to be faster and more fluid than a standard website.
Using a traditional website, the browser would communicate with the server and request a new webpage each time a new page is loaded.
With a SPA, the browser downloads and runs a small JavaScript-based application. With the JS program, you no longer need to reload any pages. The JavaScript program can communicate with the server without having to reload the page. A single page loads once, and the browser does not have to download any additional pages.
Examples of SPA websites or tools include Gmail, Trello, AirBNB, Globekit, and Moneypenny.
Using Vue.js to Build a SPA
Vue.JS is a JavaScript framework which allows you to create fluid SPAs, fast.
To get started head over to Vue.js (vuejs.org) and click “Get Started”.
Scroll down until you see the first piece of HTML code:
<script src=”https://cdn.jsdelivr.net/npm/vue@2/dist/vue.js”></script>
By adding this piece of code to your website, you can start using Vue code. Copy the script tag, and place the code snippet between the <body></body> tags of your index.html page
Creating a SPA with Minimal Code
To create the minimal amount of code and markup required to generate a SPA, within <script> tags, type the following code:
var app = new Vue({
el: ‘#app’
})
#app is the HTML element that are SPA is going to function or reside within.
Now we need to create the div with the name of “app”.
The easiest way to do this for demonstration purposes, is to create a div with id “app” on the same HTML page.
So still in index.html, scroll up and in the <body> tags again, add the following code:
<div id=”app”></div>
Remember to save the index.html file.
If you were to load or preview the SPA at the moment, you should see a blank page.
Vue has a templated language built in.
Within the “app” <div> tags, add the following code:
{{ message }}
What this should do, is echo or print out the echo variable from our application.
To create this variable, go back to the <script> tags and add the following code
Data: {
Message: ‘hello, world!’
}
So the code within the script tags should now look like this:
<script>
var app = new Vue({
el: ‘#app’,
data: {
message: ‘hello, world!’
}
})
</script>
Now if you save the index.html file and preview the website again, you should see a blank page with “hello, world!” written on the page.
Testing SPA Functionality
The website still is not very exciting, but you can use the developer console to see the potential that SPAs have. To open developer tools/console in Chrome, go to the 3 dots in the top of the menu bar, then “more tools” then “developer tools”.
Click on the “console” tab.
Type in
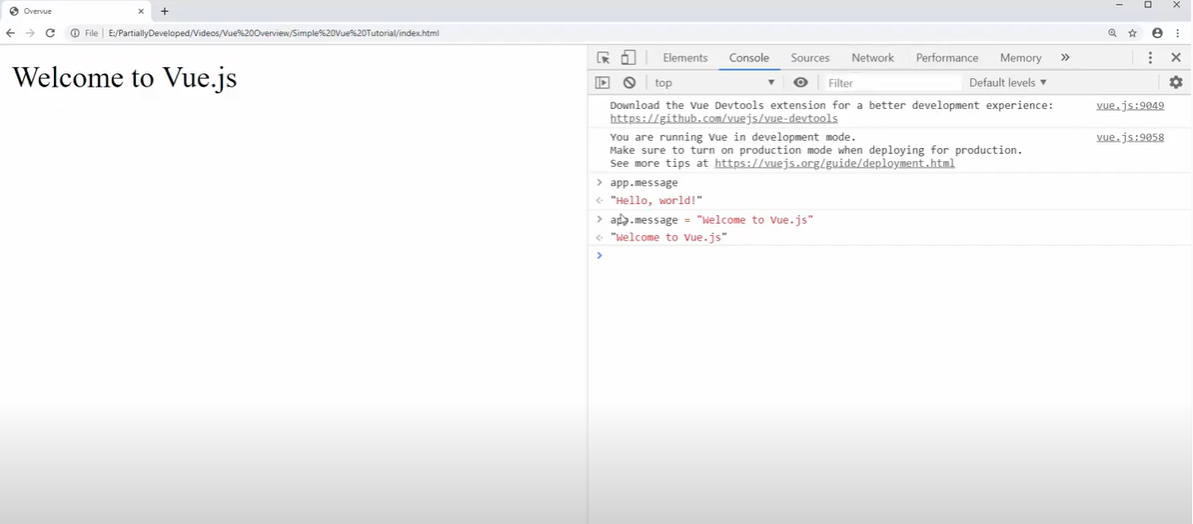
“app.message” and the console should return “hello, world!”
Thanks to the power of SPAs, you can update the message variable in the developer console.
If you enter in:
App.message = “Welcome to vue.js”
The console should return “Welcome to vue.js”
Show or Hide the Message Variable
In index.html – add a new <span> within the “app” div.
<span>This is hidden.</span>
So that the div should now look like this:
<div id=”app”>
{{ message }}
<span>This is hidden.</span>
</div>
The idea is that “This is hidden” will show if another variable is true.
Back in the <script> tags, create a new visible variable, and for now set it to “false”
<script>
var app = new Vue({
el: ‘#app’,
data: {
message: ‘hello, world!’,
visible: false
}
})
</script>
Now back in the span, add the conditional elements to the div
v-if=”visible”
so the div element should now look like this:
<div id=”app”>
{{ message }}
<span>v-if=”visible”>This is hidden.</span>
</div>
The letter “v” informs the browser that we are working with some kind of vue directive.
If will evaluate the expression, and if it’s true it will cinlude the element, if its not true, it wont include it.
Go back into your browser. If you refresh the page, nothing will change.
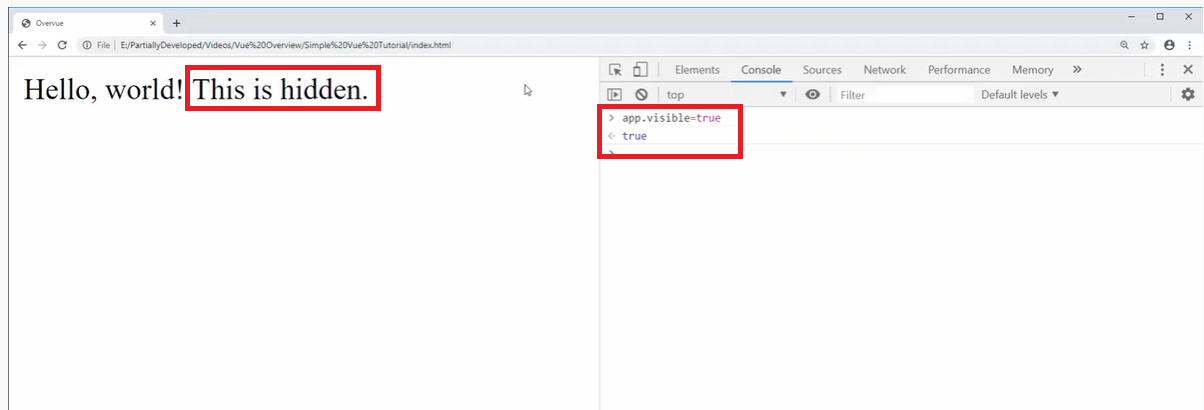
However, if you go to developer tools and the console tab again, and enter in
App.visible=true and press enter, you should see the “This is hidden” text now appear.
You wouldn’t really want a constant variable in the DOM, but you could use some kind of interactive element to tailor the page for each user and their interactions.
Adding a Loop
Back within the <script> tags, add a list of items that we can loop through.
To do this, add the following code below the “visible:false” line:
Items: [
{text: ‘Learn vue.js’},
{text: ‘we love vue’},
{text: ‘vue rules’}
Now, back in the <div> create an ordered list.
Below the “this is hidden” line of markup, add the following code:
<ol>
<li v-for=”item in items”>{{ item.text }}</li>
</ol>
So the entire div should now look like this:
<div id=”app”>
{{ message }}
<span>v-if=”visible”>This is hidden.</span>
<ol>
<li v-for=”item in items”>{{ item.text }}</li>
</ol>
</div>
Save the page and go back to the browser. Refresh the webpage in the browser and the items that we added within the script tags should now display on the page.
For illustrative purposes, we could declare that each of these items are “to do” items that have either been completed or they haven’t. To declare this, update the items with the “complete” element at the end of the code:
Items: [
{text: ‘Learn vue.js’, complete: false},
{text: ‘we love vue’}, complete: true},
{text: ‘vue rules’, complete:true}
If the item has been completed, then we want to print a line. To do that, add another <span> to the existing <div> within the <body> tags.
<span class=”complete”></span>
And then, with the <head> of the html page, add some CSS
<style>
Span.complete {
Text-decoration: line-through;
</style>
Now we can use binding to make the items conditional.
To do this, we need to add the following code, to bind a class to the relevant <span> depending on what we provide.
If item.complete is true, then we want to bind the class called “complete”.
<span v-bind:class=”{complete: item.complete}”>
<div id=”app”>
{{ message }}
<span>v-if=”visible”>This is hidden.</span>
<ol>
<li v-for=”item in items”>
<span v-bind:class=”{complete: item.complete}”>
{{ item.text }}</li>
</ol>
</div>
Now when we refresh the browser, only those items marked as “complete: true” should be crossed out.
Conclusion
This article has provided a relatively brief introduction into SPA development using vue.js as the framework. For more information on Vue.js and SPAs, we recommend the PartiallyDeveloped YouTube channel.


