Introduction to AirDrop
AirDrop is a fantastic feature available on Apple devices that allows seamless file sharing between iPhones, iPads, and Macs. Whether you want to send photos, videos, documents, or even entire apps, AirDrop makes it effortless. However, sometimes users face challenges in getting AirDrop set up and running smoothly. In this comprehensive guide, we will walk you through every step to ensure how can i turn on airdrop and start sharing effortlessly.
Checking Device Compatibility
Before diving into the setup process, it’s crucial to verify if your device supports AirDrop. AirDrop is compatible with:
- iPhone 5 and later models
- iPad Pro
- iPad (4th generation) and later models
- iPad mini (1st generation) and later models
- iPod touch (5th generation) and later models
- Mac computers with OS X Yosemite or later
Ensure your device meets these criteria to proceed with setting up AirDrop.
Step-by-Step Guide to Turn On AirDrop
1. Enable Wi-Fi and Bluetooth
AirDrop uses both Wi-Fi and Bluetooth to establish a connection between devices. Here’s how to enable them:
- Wi-Fi: Go to Settings > Wi-Fi, then toggle it on.
- Bluetooth: Go to Settings > Bluetooth, then toggle it on.
2. Access Control Center (for iPhones and iPads)
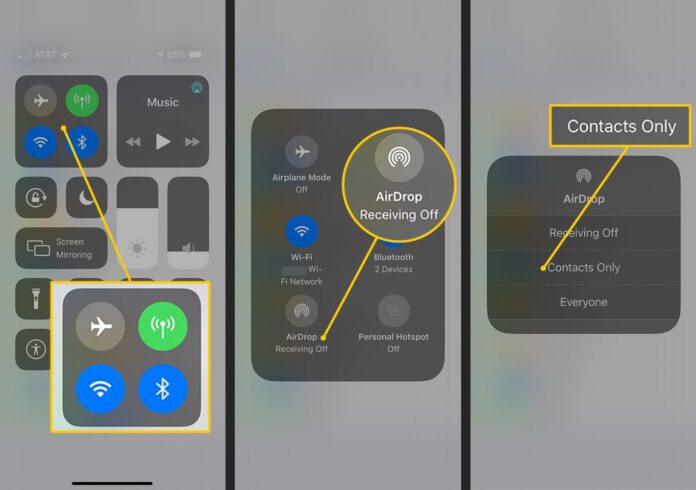
- Swipe down from the upper-right corner of the screen (iPhone X and later) or swipe up from the bottom edge of the screen (iPhone 8 and earlier) to open Control Center.
3. Turn On AirDrop
- In Control Center, press and hold the network settings card in the upper-left corner.
- Tap on AirDrop to open up its settings.
- Select either “Contacts Only” or “Everyone” depending on whom you want to be able to see your device.
4. Enable AirDrop on Mac
- Open Finder on your Mac.
- Click on AirDrop in the sidebar.
- Choose either “Contacts Only” or “Everyone” from the drop-down menu.
5. Sending and Receiving Files
Once AirDrop is enabled on both devices:
- Sending Files:
- Open the app containing the file you want to share.
- Tap the Share button or right-click on the file.
- Tap on the recipient’s device name in the AirDrop section.
- Receiving Files:
- When someone tries to share a file with you via AirDrop, you’ll receive a notification.
- Accept the incoming file to save it to your device.
Troubleshooting AirDrop Issues
Despite its simplicity, AirDrop may encounter occasional issues. Here are some common troubleshooting steps:
1. Ensure Both Wi-Fi and Bluetooth are On
Double-check that both Wi-Fi and Bluetooth are enabled on your device. AirDrop won’t work without them.
2. Check AirDrop Compatibility
Ensure that all devices involved are compatible with AirDrop. Older models may not support all AirDrop features.
3. Restart Devices
Sometimes, a simple restart can resolve connectivity issues. Restart both devices and try again.
4. Disable Personal Hotspot
If you’re having trouble with AirDrop, try turning off Personal Hotspot on your device as it can interfere with Wi-Fi and Bluetooth connections.
5. Update Software
Make sure your device has the latest iOS or macOS update installed. Updates often include bug fixes that can resolve AirDrop issues.
Conclusion
With this comprehensive guide, you should now be able to effortlessly turn on AirDrop and start sharing files between your Apple devices. By following these steps and troubleshooting tips, you can ensure a seamless experience with AirDrop.


